An Easter Gathering

Easter has always been a very special holiday for us and our families, Not only is it important to us because of our religious beliefs, but also because to us, it represents coming together with loved ones. Easters of our pasts have consisted of joining together with friends at a table, having delicious Easter brunch, and celebrating the resurrection of Jesus. Easter (to me) not only represents new life in a religious sense, but also in a literal sense with the world waking back up after it’s long winter slumber. This year, that slumber seemed especially long and dreary, so gathering around a bright table in the fresh air and sunshine was just what the doctor ordered.

We wanted to keep it simple- nothing too fancy and we didn’t want to spend a lot of money, so we primarily used things we already had around. The only things we ended up buying or renting for this particular event were tables and linens (rented), some easter paper place mats from a local favorite, Hester and Cook, flowers that we ended up snagging from Trader Joe’s (and we cut some from the yard too), and craft supplies for the kiddos from Target.

This was a fun reminder that gatherings and celebrations don’t have to be super fancy to feel beautiful and fun.

IMG_6279.JPG

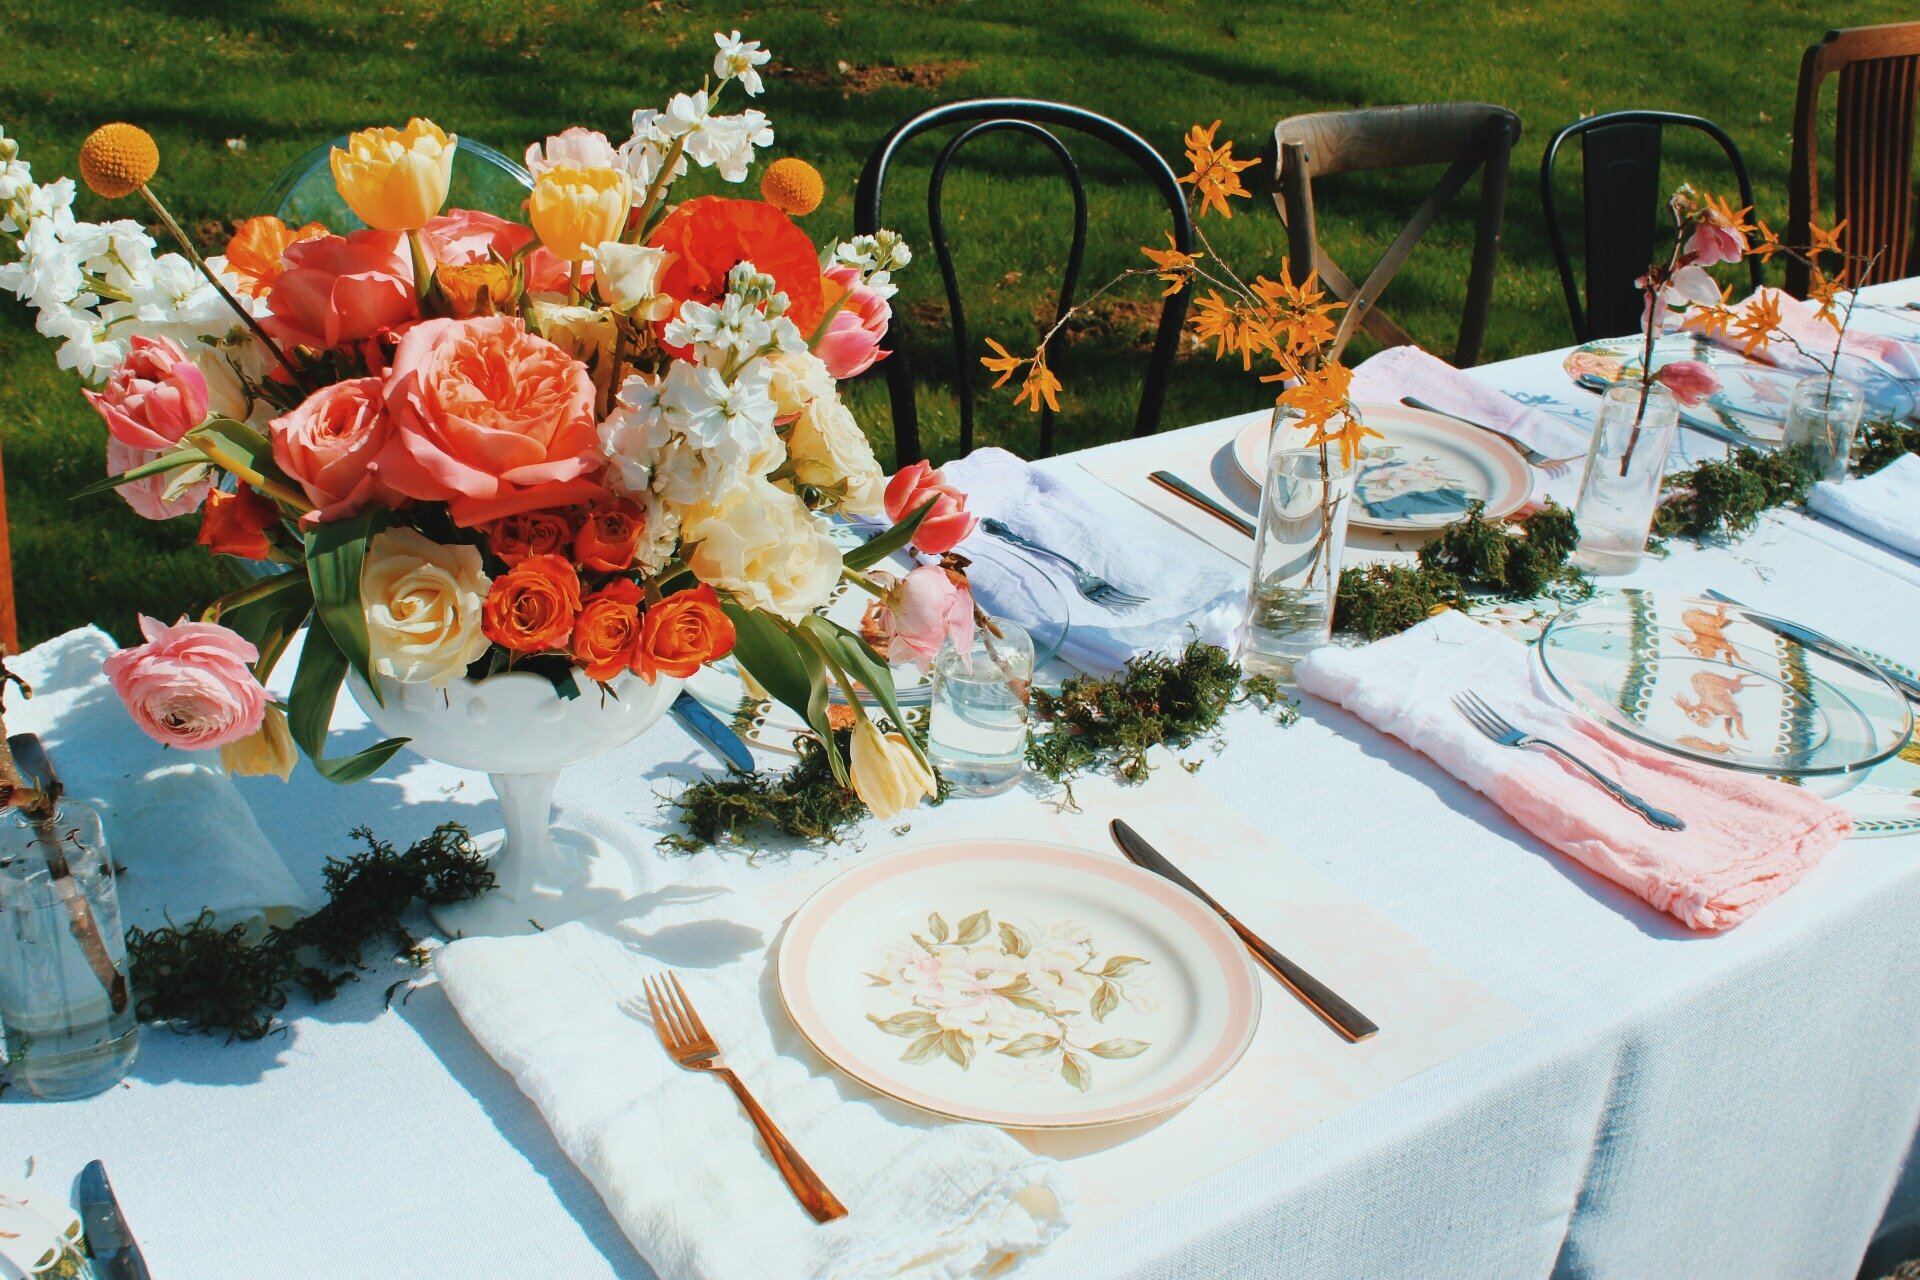
We first assessed what we had around and what we could use to decorate we table. We had plates- clear ones that were gifted to me (people tend to give me lots of event related things they don’t want, so I have a “more than average” stock stored away of these sorts of things), and then we mixed in the clear with some of my great grandmothers floral china. We used silverware that we had - we didn’t get too concerned with it all being the same. We had copper flatware and silver flatware mixed together, and for this, it worked! The napkins were flour sack towels (another item I have a large stock of) that we dip dyed in Rit Dye (you can find this at Walmart or really any craft store). We used four different colors to make it bright and fun for the occasion. We ended up using purple, rose, coral, and yellow. To make these we filled buckets with each color, grabbed the napkins in the middle, letting the edges fall, and then literally just dipped the flour sack towels in the color, rinsed them, and dried them - voila! We bought some beautiful Easter placemats from Hester and Cook, and then used some we had left over from previous years as well ( the pink/white floral were the ones we bought a couple years ago - here are some that are brighter, but somewhat similar). We gathered chairs from our houses for a mix-matched look, and I loved the way it worked for this… not necessarily practical for a larger event, but for this, it was perfect. I arranged florals in vintage compotes my mom bought me from a garage sale, and the bud vases with snippets from the yard were ones I had in stock, all from CB2. Once the table was set, we sprinkled some moss down the middle and called it a day. It was simple to put together, planned in a matter of a few days, and worked great for us.

IMG_6258.JPG
IMG_6270.JPG
IMG_6340.JPG

I wanted to have some fun activities for the kids, so I went to Target to check out the craft section. They had some paintable bunnies and eggs, which were super cute and I knew the kids would love. We made a little craft station by pulling the table out of our playroom and taking it outside, throwing some easter themed shredded paper in the middle of the table (also from Target), putting the eggs, bunnies, and paints on the table, and then letting the kids take it from there. They loved it and had an absolute blast! We also gathered some bunny ears from the Target dollar section just for fun, and the kids had a big time with those too.

IMG_6293.JPG
IMG_6297.JPG
IMG_6363.JPG
IMG_6374 (1).JPG

For food, we ended up doing a potluck. Everyone brought their favorite Easter brunch food item, and this worked out great.. We had quite the feast!

Finally, what’s Easter for the kids without an Easter egg hunt?? We filled eggs and scattered them across the yard for the kids to hunt, and I think the adults had almost as much fun with this as the kids. I ended up finding some super cute baskets for the boys from Michael’s and I am looking forward to using them for years to come ( bunny basket , carrot basket )! They had so many cute options!

IMG_6499.JPG
IMG_6302.JPG
IMG_6384 (1).JPG

I hope this blog post helps you realize you can have beautiful gatherings with what you have around your house! You don’t need to buy a lot, or bring a lot of things in. Things that are semi “thrown together” can be just a beautiful as events that take months to plan. As we are emerging out of the covid fog we have been living in, I hope you all are able to gather safely with those you love in beautiful places making beautiful memories!

IMG_6284.JPG
IMG_6318.JPG
IMG_6267.JPG

Our Kitchen Remodel

When we were looking for a new house, we knew we would be walking into something that would require a little work- we love a good challenge, and also love making things our own. The first time we walked into the house we now live in, I think we were there for a total of 10 minutes and thought, “nah, we’re good.” That night, as we were falling asleep, I said to my husband, “I can’t stop thinking about that house. I’m seeing a lot of potential in it.” He agreed that he was feeling the exact same way. We made an offer the next morning.

The original house was built in the early 60’s and hadn’t been touched since then. It was added on to in the 80s, and that part hadn’t been touched since they added it on… needless to say, the whole thing was very dated and definitely not our style.

before

before

before

before

before

before

The kitchen was originally much more closed off. When you entered the house, you entered into a very tight living room (or dining room) space. The kitchen was closed in and the flow was weird. As soon as we closed on the house, the first thing TJ (my husband) did was start knocking down that wall. The next thing he did was start taking out the kitchen cabinets.

We completely gutted the kitchen. The original floor was laminate, and once we got rid of that, we decided to extend the hardwood that’s throughout the house into the kitchen as well.

We try to do as much as we can ourselves, but there are definitely things we don’t know how to do or don’t want to mess with- for those things, we defer to Stevan from SD Construction. He helped us on our last house as well, and we can’t recommend him enough.

CE6E216F-00F7-425A-8097-AD6E284BB472.JPG

The biggest project was. the cabinets. We needed a lot of cabinets, and we also didn’t have $30k to spend on cabinets, so we decided to go a bit more of a budget friendly route. We had friends who recently renovated their kitchen. They had ended up.getting Ikea cabinets and they looked AMAZING, and the quality was actually great. They had a lot of bells and whistles that many much more expensive cabinets didn’t have, but these Ikea cabinets were a fraction of the cost.

TJ played around in Ikea’s kitchen planning system coming up with a layout for our kitchen. He uploaded the measurements, placed window and doors, and then started messing around with the cabinet and appliance configuration. Once we settled on a couple layouts we liked. We made an appointment to go and talk to a professional in Ikea’s kitchen department. We took a day, drove to Memphis, and met with a man there who spent 3 hrs showing us different things we could put in our cabinets and different ways to make it work. He then ordered everything for us and it would be shipped to out house. We also ended up getting our sink, which is a white farmhouse sink, from Ikea as well.

814F08FB-C0D4-44B9-B316-5E298DE7425A.JPG

Although we were getting cabinets from Ikea, we still wanted everything to look a little bit more custom. We ended up ordering Shaker cabinet doors and side panels from Semi-Handmade, and then had a local painter paint them. The original paint color we chose was Sage Green Light by Sherwin Williams, but for some reason when the painter put it into the sprayer, it slightly changed hues and ended up being more of a custom green. I actually like the color we ended up with more than what we originally chose, which was pretty lucky! We truly LOVE our cabinets. Don’t we all love happy accidents?

For countertops, we knew we wanted something different for the Island and the Countertops- I loved the look of Marble, and the look of Soapstone, but didn’t know about how practical either of those would be. We met with the fine folks at Southern Stone. After weighing the pros and cons of both, we ended up actually going with a honed White Carrera Marble for our countertops, and honed Black Mist Granite for the island. I just couldn’t get past my love for marble, even if it is a little less durable. I actually love it more as it ages, so this worked for us. We knew the island would be used more, so we wanted to make sure that whatever went on it was really durable. The black Granite we chose actually looks a lot like Soapstone, so I was really happy with that. On another note in regards to the island, the inlaid shelving that you’ll find on both sides of the island are also Ikea shelves. I believe they are actually meant to hang from the ceiling, but we configured it to be within the island to add just a little something different, and as a nice place for cookbooks to rest.

0C1552DA-F005-46C3-B65C-4C7128FFAC82.JPG

We kept the paneling that was originally in the kitchen and added more behind the open shelving to make it cohesive. All we had to do to it was add a little paint- we used Snowbound from Sherwin Williams. The open shelving was easy. We ended up buying Poplar wood from Walker Lumber here in town, adding polyurethane, mounting it on the brackets, and that was about it. We didn’t put any stain on it. The brackets were from World Market. I wanted something simple for those, so these were the perfect fit.

For the cabinet hardware, I originally wanted these from CB2 (which I still LOVE), but it was going to be pretty pricey to get as many as we needed, so we ended up going with these pulls and knobs found on Amazon, and honestly they are great. We love them.

Our faucet is Kingston Brass, which we also got off Amazon. The quality is fantastic and we are so happy with it. I highly recommend it! The sconces over the shelves and then hanging pendants over the island were all found via Illuminate Vintage on Etsy. I can’t find our exact pendants, but they are basically what I linked with a black cord and round glass shade. They have soooo many beautiful fixtures. The ones we got were perfect, and I am so impressed with them.

72E2692E-868E-46B9-AF2D-B9BA17197A25.JPG

As far as decor goes- I tend to collect things. I have collected things from my grandmothers, antique stores, estate sales, thrift stores, garage sales, etc over the past several years. I think I really started getting into antiquing/estate sales early on in college and it’s one of my favorite hobbies. I love mixing more modern elements with antique/vintage items. I would say around 90% of the items on the shelves in our kitchen are OLD. I love thinking about all the other kitchens and homes they have been in over the years, and imagining all they’ve witnessed. If you can’t tell, I romanticize the history of things quite a bit, but I also think antique and vintage pieces add a lot of character too.

Our kitchen table was from Craigslist, and the chairs are from Wayfair. We truly buy very few “new” things. Part of the reasoning behind this is budget, but a lot of it is simply because we just like to breathe new life into older pieces, or refinish them to make them our own.

C4DBB7DF-4B94-429C-8487-137B15B9778C 2.JPG

Whenever you are working on a space, the things you are putting into it should feel like you. We tried to fill this kitchen with things we truly love and find beautiful, and I am so happy with how it all turned out. Please feel free to reach out with any specific questions about things I didn’t mention. Thanks for reading!

10 Ways to Save Money on Flowers

photo by Eden Ingle

photo by Eden Ingle

FLOWERS! They add so much to a wedding set up, but man, can they be expensive. Flowers are an expense with a big sticker shock. Many couples are blown away when they see floral quotes, and a question I get all the time is “how can I cut floral costs”!? Let me first say that flowers, even when florists are buying them at wholesale costs, are truly not cheap. Florists also have to pay themselves as well as include the cost for labor, supplies, staff, etc. It makes sense that they bigger wedding expense, however, there are some ways to cut costs!

Reuse Your Blooms!

One of the best ways to save money on florals is to reuse your florals. Your guests will (in most cases) not be seeing your ceremony and reception set ups at the same time. Take things that are being used for your ceremony and reuse them at your reception. Your florist can help you think of innovative ways to do this. Here are a couple of ideas:

  • Reuse your bridesmaids bouquets as centerpieces

  • Reuse your bridal bouquet on your sweetheart table, cake table, or somewhere else that needs an accent

  • If you are having an arbor or ceremony backdrop that is easily moveable, you can have it moved to accent your cake table or sweetheart table

Focus On the Areas That Will Be Photographed the Most

I know you want your whole wedding to be overflowing with flowers like the gorgeous wedding you saw on Pinterest, but homegirl on Pinterest may have had an unlimited flower budget, and as much as you wish you could recreate that look, your budget just isn’t going to do it. You don’t need GRAND flower arrangements all over the place. Focus on the areas that will made the biggest impact- for example; your ceremony space (but also try to think of ways to reuse these flowers somewhere else), your sweetheart or head table, and if there is a big blank wall or space within your reception space-think of something fun to do there so that it doesn’t look blank. Go lighter on your guest tables and in other areas that won’t be photographed quite as much. Most guests don’t like when there is a big centerpiece getting in the way or blocking their view anyways!

Go For Smaller Arrangements

I touched on this a little bit in the last tip, but cutting down on size will cut down on costs. Ask your florist if scaling back on the size of arrangements, bouquets, or ceremony backdrop will help cut back on cost. Smaller arrangements can still have BIG impact. Bud vases are also a great option!

Mix it Up

I always recommend using at least two different styles of centerpieces to add depth to the room. Talk to your florist to see if you can come with a more average priced centerpiece to mix with a lower priced centerpiece. I also LOVE using candles to help fill up a space and add warmth. You can even create a centerpiece fully out of candles, and just put some greenery or blooms around the base. Compare the cost of getting candles through your florist and buying them yourself. I order glass cylinders for pillar candles through Dollar Tree’s website- they are only $1. Candle cost will depend on the type of candle you want, but there are several places online where you can find good deals,

Don’t Get Tied Up on One Type of Bloom

We all love Peonies and yes, they are wonderful and beautiful, but those suckers are expensive, and very few people can afford to use them everywhere. If there is a type of bloom that’s expensive, but you HAVE TO HAVE IT!!! Consider using that bloom only in places that will be focal points- like your bridal bouquet. For most expensive blooms, there is typically a less expensive bloom that looks similar and can still have the same impact!

Go for Greenery

While greenery isn’t exponentially cheaper than blooms, it is a little bit cheaper. Bulking up your arrangements with greenery rather than blooms can definitely cut cost- at least a little bit, and they will still have a great impact. If you want large arrangements, consider using more greenery and less blooms- it will definitely save you a few bucks.

Do Some of it Yourself

While I don’t love this option, it is definitely an option (unless your venue has restrictions against it). If you are wanting to try your hand at putting together floral arrangements, this is a good chance, BUT make sure you can put together whatever you are going to put together before your wedding day. When I was getting married, we were on a budget and didn’t want to spend a lot on flowers. My bridesmaids and I spent some time the night before the wedding and we all put together our own bouquets and helped each other- it was actually a lot of fun! There are local wholesalers who are open to the public. If you want to go this route, I still recommend hiring a florist for those bigger accent areas- for example, your ceremony back drop and your bouquet.

Use Local and Seasonal Blooms

While this isn’t always an option, it never hurts to ask! Talk to your florist and see if local and seasonal blooms are available the time of year you are getting married and within your color palette. Bonus - you’d be supporting local farmers!

Fill Up Big Blank Spaces with Plant Rentals

If your venue has a lot of open space, consider filling It up with rentals like trees or plants from a local nursery. Sometimes doing something like this is more cost effective then filling up space with a big floral arrangement.

Be Flexible and Go For Bigger Blooms

Be open-minded and flexible. Ask your florist for ideas! Don’t write off cheap blooms. There are several less expensive options out there that can be great filler flowers for bulking up a bouquet rather than focusing on only using popular, expensive blooms. Using a couple blooms that are bigger and take up more space is also a great way to cut back on the amount of blooms that will be needed!

Stay safe out there! As always, you can email us with any questions. Sending virtual hugs!

Valentine's Day Gift Guides

Finding the perfect Valentine’s gift for the loved ones in your life can sometimes be just a little challenging. We decided to gather up some of our current favorites, as well as some things that are on our wish lists, to make shopping a little bit easier for you.


FOR HER

Screen Shot 2019-02-08 at 9.19.53 AM.png

From Left to Right:

  • The Anatomy of Color- My husband gave me this for Christmas, and it’s so inspiring. Also makes a great coffee table book!

  • A gorgeous painting! This one is by Laci Fowler Art, whose art I’ve been crushing on for some time now.

  • Work Hard and Be Nice to People- I’ve been wanting to add this addition to our home for sometime now. Love everything about it!

  • Diptyque Figuier Candle - Smells absolutely marvelous. The scents from these candles will fill your home and linger for a while

  • MATE the Label Lounge Set- I love a good lounge set, and this one meets the bill in all areas, super cute, comfy, and great quality.

  • Tavola Wine Subscription- This is a dream for the local to Nashville wine lover. Robin carefully curates three bottles of wine each month and they are delivered to your door. They also come wrapped and looking super cute. Win. Win. Win.

  • ABLE Clutch- I’m a big fan of the versatility of this clutch. You can dress it up, dress it down, carry it in the summer, or carry it in the winter.

  • Madewell PJ Set - Anyone else feel like you sleep better when you sleep in cute PJs? I do!

  • Shop Boutonné Rucksack- As a mom and event planner, I find myself having to carry a lot of things. This bag is amazing, will stand the test of time, and has extra room for me to throw a few diapers in there. Love it!

  • Consider the Wldflwrs Signet Ring- A signet ring has been on my wishlist for a while. I can’t imagine one being more perfect than this!

  • Anthropologie Throw Blanket- I love dressing up a couch or chair with a throw. This one is perfection.

  • Le Labo Bergamote 22- Le Labo’s perfumes are classic and amazing quality. I currently wear the Santal 33, but may have to splurge on the Bergamote 22 to switch it up. It’s light , fresh, and feminine. Perfection.

FOR HIM

Screen Shot 2019-02-08 at 10.22.09 AM.png

From left to right:

  • Apple HomePod- This one is a little bit of a splurge, but it’s a good one. My husband got one for Christmas and loves it. It has really great quality sound, gets loud, and is great for everyday background music or a party

  • Pipe + Pipe Tobacco - This is a gift for the occasional tobacco pipe smoker. Well crafted pipes can be really beautiful, and I myself don’t mind the smell of pipe tobacco. If you are looking for somewhere to get pipe tobacco and you’re local, I recommend Uptown’s Smoke Shop in Green Hills.

  • David Arms Tie - David is local to Nashville and has a beautiful gallery in Leiper’s Fork. He and his wife recently started designing fabrics for ties. Perfect for the classic gentleman

  • Weller Antique - For the Whiskey Lover. I don’t think you can find this online, and you’d probably have a hard time finding it in liquor stores, but it is absolutely top notch. I recommend checking out Red’s Wine and Spirits in Bellevue. They may not have it out, but try asking if they’ve got any bottles in the back

  • Colonel Littleton Portfolio - Another Tennessee based company, Colonel Littleton’s products are gorgeously and meticulously crafted. I had one of these portfolio’s given to me as a gift and I have loved it. This is a perfect gift that will last a lifetime and get even better with age.

  • Imogene + Willie Key Ring - Simple and to the point. A great gift for any guy in your life.

  • Rudy’s Barber Shop Trio - Unexpected and useful. When we stayed at the ACE in NYC in November, these were the products in our room. My husband loved them so much that he asked for them for Christmas.

  • J Crew French Terry Sweatpants - Everyone needs a good set of loungers

  • Ranger Station Birch Bark - Woodsy and wonderful. Perfect for the outdoorsman

  • Yeti Roadie - A smaller version of the traditional Yeti cooler. Perfect for the boat, beach, or duck blind

  • Richard E Bishop Decanter Set - These decanter sets are an absolute favorite. Timeless, beautiful, and well crafted.

  • The Road by Cormac McCarthy - A favorite book of my husband. Perfect for any man in your life.

FOR YOUR GAL PALS

Screen Shot 2019-02-08 at 9.20.36 AM.png

From Left to Right

  • Mint Bath Salts - Perfect for a pampering every now and then

  • Rise and Shine Journal - A great gift for the gal that like to write. I personally have this journal and it makes me happy every morning when I sit down to write in it.

  • Jewelry Boxes - Simple and beautiful- perfect for every jewelry lover in your life.

  • Tavola Wine Class - Another shout out to Robin over at Tavola- her wine classes are fantastic and I highly recommend them. This would be such a fun night out with your girlfriends. Even better, hire her for a private class, provide dinner, and let Robin talk your through all sorts of different wines.

  • Mario Badescou Aloe, Chamomile and Lavender Spray - A little luxury that makes you feel like a million bucks. Bonus points because it smells amazing.

  • Brass Coaster Set - Perfect for the entertainer. These Brass Coasters are sure to elevate any coffee or side table.

  • Statement Earrings - I’m a sucker for a good statement earring. They can elevate just about any outfit. These are in particularly great because they are a neutral color, which allows you to wear them with just about anything.

  • A Neck Scarf - Similarly to the earrings, a good bandana can complete just about any outfit!

  • Hampton Leather Works Makeup Bag - I have had one of these for a few months now, and it’s perfect to throw inside a purse to keep up with all the little things.

  • Clary Balm - I can’t say enough good things about this stuff. It’s perfect for anyone, can be used on just about anything, and is all natural. Definitely a winner.

  • Upstream by Mary Oliver - I love me some Mary Oliver. This collection of Essays is beautiful and inspiring. Perfect for any lady in your life.

  • Ceramic Travel Coffee Mug - Coffee is always better out of a cute cup, if I do say so myself.